

Lineage OS 15.1 For Google Nexus 5X-
Lineage OS 15 for Google Nexus 5X is Here, in the article we Provide Lineage OS 15.1 ROM for Google Nexus 5X With Complete Install Guide, By Following the article you can easily Install Best Custom ROM on Google Nexus 5X. With the new Lineage OS, you can enjoy the latest features which comes with Android oreo as well as Lineage OS features. This is not an official Lineage OS ROM built for Google Nexus 5X, but you can enjoy the real feature made from the Lineage OS gerrit. The ROM is initial state and You can’t use as a daily driver. Now Download the Android oreo for Google Nexus 5X. You need a Custom Recovery like TWRP to Install Unofficial Lineage OS 15 on Google Nexus 5X.
Загрузите и установите Lineage OS 15 для Nexus 5 [hammerhead]
Если вам нравятся кастомные прошивки, то LineageOS — одна из самых популярных кастомных ОС в истории Android. Как мы знаем, Lineage поддерживается командой Lineage, людьми, стоящими за компанией Cyanogen.inc. Недавно LineageOS сообщила, что установил 1 миллион ОС. На основе более ранней версии Android Nougat на базе LineageOS 14 они разработали ОС для более чем 160 устройств. Вот список поддерживаемых устройств LineageOS 14.1.
LineageOS 15 основана на последней грядущей версии Android 8.0 Oreo. Android Oreo в настоящее время выпущен только для устройств Google Pixel и Nexus, и мы можем ожидать официальный выпуск Android Oreo для большинства других устройств в конце 2017 года или до июня 2018. В этом руководстве мы расскажем, как установить Lineage OS 15 для Nexus 5. Загрузите и установите Lineage OS 15 для Nexus 5 (головка молотка).
Что такое Lineage OS?
Что такое Android O или Android 8.0 Oreo?
Android 8.0 Oreo — это последняя версия операционной системы Android. Это 8-я основная версия мобильной операционной системы Android после выпуска Android Nougat. Последние функции Android Oreo включают в себя уведомления о новых приложениях, точки уведомлений на значках приложений, режим «картинка в картинке», приложение Android Instant. совместимость, автозаполнение (как в Chrome), лучшее копирование и вставка, более быстрый Android за кулисами, лучшее время автономной работы с более продвинутым режимом Doze, и более.
Особенности Android Oreo:
- Каналы уведомлений — Эта функция дает возможность группировать уведомления от множества приложений в один канал. Это означает, что вы можете группировать уведомления для определенных приложений вместе и упростить управление уведомлениями. В целом это хорошее дополнение к тому, что Google начал с Android Nougat.
- Картинка в картинке — Видео будут переключаться на уменьшенные и свернутые версии при переходе к другим приложениям. Эта функция похожа на то, что делает видео YouTube в мобильном приложении YouTube, когда вы перетаскиваете его в угол.
- Поддержка нескольких дисплеев — Эта функция предоставит вам возможность запускать действие, скажем, Chrome, на удаленном дисплее, таком как HDTV или дисплей ПК. Возможности применения этой функции безграничны.
- Клавиатура навигации — Эта функция предоставит вам возможность использовать клавиши для навигации по приложениям.
- Пределы фона — Эта функция позволит вам установить предел того, что приложение может делать, когда оно работает в фоновом режиме. Вы можете использовать это для экономии энергии и, в свою очередь, увеличения срока службы батареи.
- Новые функции Wi-Fi — Эта новая версия Android будет включать больше функций Wi-Fi, таких как Neighborhood Aware Networking (NAN), которые позволяет устройствам легко подключаться друг к другу без точки доступа в Интернет или доступа в Интернет на все.
- Лучшие иконки — Google сделал иконки в Android O адаптивными. Это означает, что они будут принимать разные формы в зависимости от системы, в которой они используются. Это крутая функция, не правда ли?
Проверьте 10 основных функций Android 8.0 Oreo
Статус разработки Nexus 5 LineageOS 15
Обновлено в августе 2017 г .: Наконец, после выпуска образов Android Oreo Factory для Nexus и Pixel компания Google опубликовала исходный код AOSP. Сейчас разработчик уже начал свой проект по созданию кастомного ПЗУ на базе Android Oreo.
ПРЕДВАРИТЕЛЬНЫЙ РЕКВИЗИТ
- Это будет работать на Nexus 5 (не пытайтесь использовать это на других устройствах):
- Зарядите свой телефон до 80% или 70%.
- Вы потеряете исходное ПЗУ или любое ПОЛЬЗОВАТЕЛЬСКОЕ ПЗУ, если вы уже установили его на свой телефон. Так что не забудьте Сделайте резервную копию вашего телефона с помощью TWRP перед выполнением этого шага с помощью TWRP, CWM или любого Custom Recovery.
- Вы также можете резервное копирование всех ваших приложений с помощью Titanium Backupили вы можете Бэкап без рута
- Вы должныустановите TWRP или любое Custom Recovery на свой телефон.
- Смотреть Полное видео о том, как установить TWRP на любом телефоне Android.
- Загрузите все Zip-файлы снизу и поместите их в корневой каталог внутренней памяти телефона.
СВЯЗАННЫЙ ЗАПИСЬ
- Скачать Android 8.0 Oreo для Nexus 5
- Как установить Lineage OS 15.1 для Google Nexus 5 (Android 8.1 Oreo)
- Скачать Установить Android 7.1.2 Nougat на Nexus 5 (Custom ROM, AICP)
- Как рутировать и установить официальное восстановление TWRP для Nexus 5
- Как установить официальную ОС Lineage 14.1 на Google Nexus 5
Lineage OS 16 Features | Pie 9.0:
1. New Gesture Navigation
This time lineageos 16 comes with new gesture support instead of using default buttons that are back, home and recent it gives access to gesture support to perform the same action. Just like iPhone X you can swipe up to see the recent screen and swipe back to go back and much more gesture are built in lineage os 16 rom for Google Nexus 5
To try it, head to Settings > System > Gestures > Swipe up on Home button. Your navigation bar will change right away.
2. Adaptive battery
The common issue that every android device face is poor battery optimization. This feature will be learning your usage history and smartly save battery in lineage os 16 by restricting app with rare usage that will improve battery performance.
3.Slices
Slices will provide in-app functions without entering the app. In fact, whenever a user will search for a particular app, the search will prompt a few quick options related to that app which will make it really easier and quicker. This will be also a new feature added in lineageos 16 on Google Nexus 5 this time.
4.Digital Wellbeing
The Digital Wellbeing part of Android will be one of its most interesting feature in lineageos 16. This is a suite of features Google has designed to help you see how often you use your phone, and what apps you spend the most time in. Like many times they lock the device etc. The users will be able to get the amount of time they are spending on different apps and will also get to set timers on such apps that happen to be addictive. So above are some great features that come with lineage os 16 and you can start using these feature on your Google Nexus 5 by installing lineage os 16 by upgrading to newer version of Android i.e Android 9.0.
Pre-Requirements:
Take care of following tasks before you proceed with flashing custom ROM:1. Your Google Nexus 5 should be root and twrp recovery should be installed. 2. Be sure to backup your data including Contacts, SMS / MMS, APN & MMS Settings as well as photos and videos stored on your device’s internal or external storage. 3. Make sure that your device is well charged. Ideally, the battery level should be around 60-80%. The more the better.4. Now proceed To Install Official Lineage OS 16 On Google Nexus 5
Updates: Device Getting Android P 9.0 Rom Lineageos 16
How to Install Lineage OS 16 On Google Nexus 5 | Android 9.0 Pie
Download and transfer the Lineage OS 16 Android Pie 9.0 ROM and Gapps for lineage OS 16 in your Google Nexus 5.
Boot your device into TWRP recovery.
Select “Wipe” from TWRP main menu and do a “Swipe to Factory Reset” on the bottom of screen.└ Note: This will factory reset your device. If your custom ROM doesn’t require a factory reset, then simply skip this step.
see also: How to Install Gapps via TWRP Go back to TWRP main menu, tap on “Install” and select the Lineage OS 16 Android Pie 9.0 ROM .zip file and gapps for Android Pie 9.0 that you transferred to your device in Step 1.
After selecting the .zip file, do “Swipe to Confirm Flash” on the bottom of the screen to begin the custom ROM installation process. This may take some time.
Once your ROM is successfully flashed, you’ll see “Wipe cache/dalvik” option, select it and then do “Swipe to wipe” on the bottom of the screen.
Once cache & dalvik wipe completes, hit the “Back” button on-screen and then select “Reboot System” button.
Refer to the video for full step by step guide on how to install lineage os 16 on Google Nexus 5.
Related: How to Root Lineage os 16
https://youtube.com/watch?v=p7j_DcAXmgg
Once the installation process is done, reboot your phone and you will be booted into Official Lineage OS 16 Based on Android Pie 9.0. If you have any doubts regarding this process, feel free to comment below.
Upgrade to a higher version of LineageOS (e.g. lineage-15.1 -> lineage-16.0) on hammerhead
Important: Please read through the instructions at least once completely before actually following them to avoid any problems because you missed something!
Warning: These instructions only apply to version upgrades. If you wish to downgrade to an earlier version of LineageOS, follow your instructions for installing LineageOS the first time.
Manually upgrading LineageOS
Tip: In some cases, a newer LineageOS version may not install due to an outdated recovery.
Follow your to see how you can update your recovery image.
The updater app does not support upgrades from one version of LineageOS to another, and will block installation to any update for a different version. Upgrading manually requires similar steps to installing LineageOS for the first time.
- a LineageOS install package.
- Make sure your computer has working . Setup instructions can be found here.
- Enable on your device. Additionally, open Settings, then “System”, then “Developer Options”, then select “Root Access Options”, and finally “ADB Only”. Now, run ’
-
Run .
Important: The device may reboot to a blank black screen, fear not, this is a known bug on some recoveries, proceed with the instructions.
- Run (inserting the path to your LineageOS package).
-
(Optionally): If you want to install any additional add-ons, click , then , then swipe to begin sideload, then those packages in sequence.
Note: If you previously had any Google Apps package installed on your device, you must install an updated package before the first boot of Android! If you did not have Google Apps installed, you must wipe the Data partition (or perform a factory reset) to install them.
- (Optionally): Root your device by installing LineageOS’ AddonSU, (use the package) or by using any other method you prefer.
- Once you have installed everything successfully, run .
Warning: Depending on which recovery you use, you may be prompted to install additional apps and services.
We strongly advise you to opt out of installing these, as they may cause your device to bootloop,
as well as attempt to access or corrupt your data.
FAQ (Frequently Asked Question)
Google has recently released there Android 11 major updates that come with various functionality. Therefore, The latest Android 11 based custom skin start building, and the LineageOS 18 are among the most popular custom ROM. Currently, LineageOS 18 is available for 30+ Mobile devices so far, and there was a lot of
the developers have developed an unofficial custom ROM.
When LineageOS 18 has been available to download?
Official LineageOS 18 has been available to download with Android 11 based featured in many devices available for the individual builds mentioned in this article.
When my device is to get an update with LineageOS 18?
It takes time because LineageOS 18 has been build by individual developers, not like stock ROM or developed by OEM. Therefore, there was some selected device LineageOS 18 has been available throughout as the time extends.
What are Add-On DOwnloads
There were a few applications that you need to download, such as GApps (Google Application). Furthermore, the Android 11 based custom ROM LineageOS allow needing to root, which you can do using TWRP. Not to mention, It also gives you the power to use the Google Camera on your smartphone so far.
What if LineageOS 18 is not available to download.
You can download another version of LineageOS, and there were many options such as Pixel Experience, RevengeOS ROM.
Hopefully, We believe you have successfully installed LineageOS 18.1 on your Google Nexus 5 (hammerhead). Thanks for being with us. Don’t forget to share the bugs, so we can share with developers to fix those issues in the comment section below.
Ссылка для скачивания
Смотрите обзор Lineage OS 15.1
Lineage OS 15.1 ROM
Скачать Lineage 15.1 Gapps
Руководство по прошивке кастомного ПЗУ с помощью TWRP Recovery
Руководство по рутированию любого пользовательского ПЗУ
Это оно! Надеюсь, вы установили Lineage OS 15.1 для Nexus 5. Оставьте комментарий или отзыв ниже. Спасибо!.
- Официальный и неофициальный список устройств Lineage OS 14.1 и ссылка для скачивания
- Список устройств с Lineage OS 15.0 (Android 8.0 Oreo)
- Список поддерживаемых устройств для Lineage OS 15.1 (Android 8.1 Oreo)
- Android Oreo здесь: список официально поддерживаемых устройств
- Список поддерживаемых MIUI 9 устройств — официальных и неофициальных
- Список всех устройств, поддерживающих AOSP Android 8.0 Oreo
- Дата выхода Resurrection Remix Oreo: список поддерживаемых устройств
Кредит предоставляется: Krizthian
Install Lineage OS on LG Nexus 5
1) You Need to have a Unlocked bootloader and have a custom recovery like TWRP flashed. If you haven’t already done then there is an article on how to flash TWRP and root Nexus 5 read it here
2) Take a Complete Backup of your Device. This is the most important step as if you screw up something you’ll have a complete backup so you can restore to the previous state. Here is a video on How to Backup your android.


![[lineageos 17] nexus 5x lineage os 17.1 скачать — android 10](https://mpshes.ru/wp-content/uploads/d/7/8/d78f59e8b20e54e015f2a494c40aaf89.jpeg)


![How to install lineage os 15.1 google nexus 5x [bullhead] - rom-provider](https://mpshes.ru/wp-content/uploads/b/3/3/b33c73f5debf006857643462119be3b2.jpeg)
3) Download Lineage OS for LG Nexus 5 From Here From here for p4rot’s Build (currently Updated Daily), or download from here for razorloves Build.
4) Download Gapps for google apps from here.
5) Copy the downloaded files to the internal storage of your LG Nexus 5.
6) Shut down your Android device and then hold Volume Down and Power button simultaneously to boot into recovery.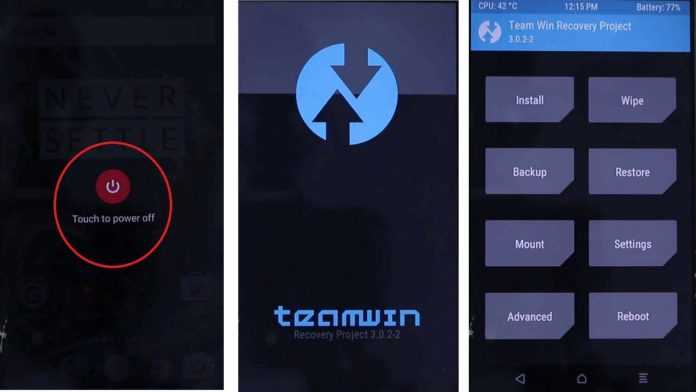
7) Once booted into TWRP click on —>»wipe» then on —> «Advance wipe » then select every other partition other than the Internal Storage then Swipe to format these partitions.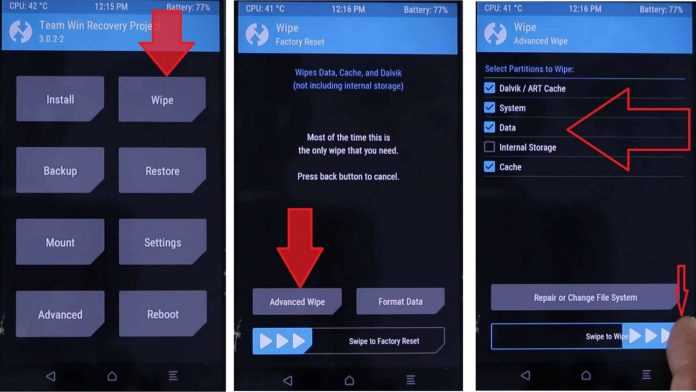
![]() Go back to the home page of the TWRP then tap on —>»Install», then navigate to the folder where you have copied the Lineage OS rom and the Gapps file which you downloaded before.
Go back to the home page of the TWRP then tap on —>»Install», then navigate to the folder where you have copied the Lineage OS rom and the Gapps file which you downloaded before.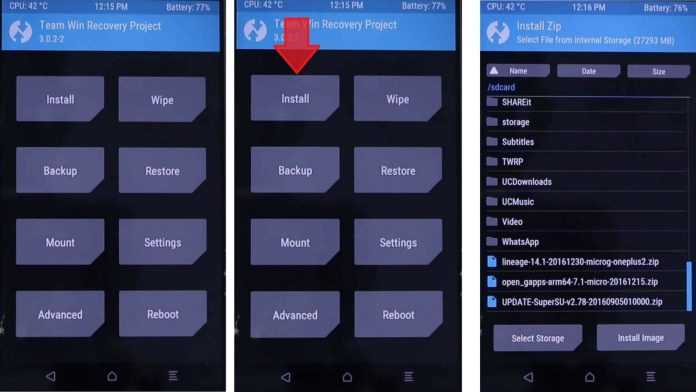
9) Select the —>»Lineage OS rom zip file» and then click on —>»Add More Zip Files», then select the —>»Open Gapps Zip File», then swipe to confirm the flash and wait until it gets completed. Have patience as it may take 5-20 minutes for installation. 
10) Once completed you can tap on the option which says —>»Reboot to System», this will again take around 5-20 minutes for rebooting for the first time.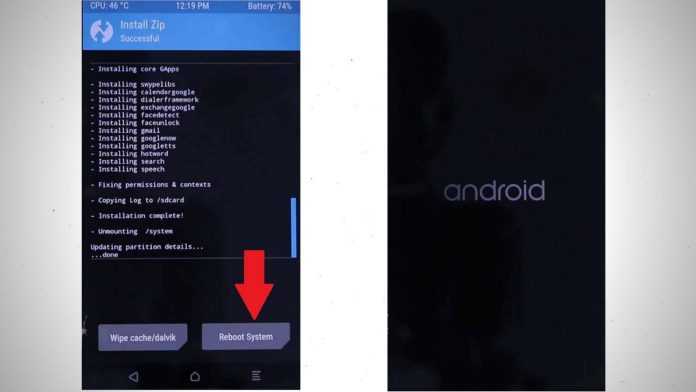
11) Now select your Language and configure your device like you would do when you have brought an new Android.
12) While configuring your google account if you are redirected back to the first stage of configuration then disconnect from the wifi and turn of your Mobile data and skip google account configuration for now and you will be good to go!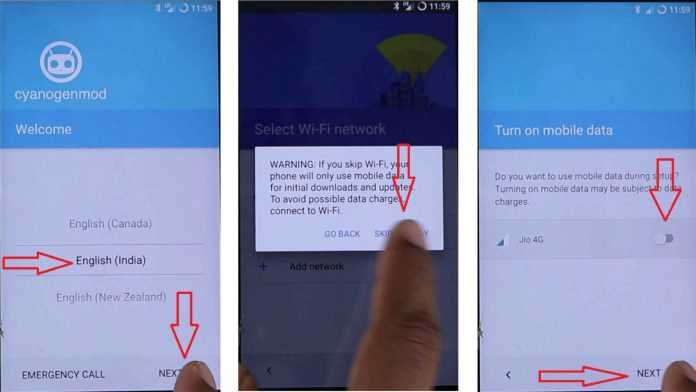
Upgrade to a higher version of LineageOS (e.g. lineage-15.1 -> lineage-16.0) on bullhead
Important: Please read through the instructions at least once completely before actually following them to avoid any problems because you missed something!
Warning: These instructions only apply to version upgrades. If you wish to downgrade to an earlier version of LineageOS, follow your instructions for installing LineageOS the first time.
Manually upgrading LineageOS
Tip: In some cases, a newer LineageOS version may not install due to an outdated recovery.
Follow your to see how you can update your recovery image.
The updater app does not support upgrades from one version of LineageOS to another, and will block installation to any update for a different version. Upgrading manually requires similar steps to installing LineageOS for the first time.
- a LineageOS install package.
- Make sure your computer has working . Setup instructions can be found here.
- Enable on your device. Additionally, open Settings, then “System”, then “Developer Options”, then select “Root Access Options”, and finally “ADB Only”. Now, run ’
-
Run .
Important: The device may reboot to a blank black screen, fear not, this is a known bug on some recoveries, proceed with the instructions.
- Run (inserting the path to your LineageOS package).
-
(Optionally): If you want to install any additional add-ons, click , then , then swipe to begin sideload, then those packages in sequence.
Note: If you previously had any Google Apps package installed on your device, you must install an updated package before the first boot of Android! If you did not have Google Apps installed, you must wipe the Data partition (or perform a factory reset) to install them.
- (Optionally): Root your device by installing LineageOS’ AddonSU, (use the package) or by using any other method you prefer.
- Once you have installed everything successfully, run .
Warning: Depending on which recovery you use, you may be prompted to install additional apps and services.
We strongly advise you to opt out of installing these, as they may cause your device to bootloop,
as well as attempt to access or corrupt your data.
How to Unlock Bootloader on Google Nexus 5 (hammerhead)
- Start with Enabling Developer mode On Google Nexus 5 (hammerhead)
- Open the settings on your Mobile, and select “About.”
- Tap seven times on “Build number.”
- Go Back to Settings, And Search “Developer option,” and Open It.
- Now, Enable OEM Unlock and power Off your mobile.
- Now, open your smartphone into a Download mode by pressing and holding the volume down button and power button.
- Enter the following command to reboot into bootloader mode.“adb reboot bootloader.”
- Now perform the command below to unlock the bootloader of Any Lenovo Smartphone.“fastboot OEM unlock” Or “fastboot flashing unlock.”
- Now, press Volume Up to unlock the bootloader.
- After that, Restart your Mobile.
Install LineageOS 18.1 on Nexus 5
- Execute the below command in the CMD window to boot your device to TWRP Recovery
- adb reboot recovery
Now that your device is booted in TWRP recovery mode, go to the Wipe section and press advance wipe.
Then, select the System, Vendor, Data, and the Cache partition and perform a right swipe to format the selected partitions.
After this go to the install section and find the downloaded LineageOS 18.1 zip file to install the file select and perform the right swipe.
This process takes a few minutes so wait after that finish the flash you can go again to the install section this time select the GApps ZIP file and perform the right swipe to install it.
You also need to wipe the cache partition. You could either use the Wipe Cache button that would be available after flashing GApps.
Reboot your device to the newly installed OS. For that, go to the Reboot and select System.
Links:-
Unlock bootloader and flash TWRP :- http://bit.ly/2hIDpd7
TWRP for LG Nexus 5 :- https://dl.twrp.me/hammerhead/
Lineage OS for LG Nexus 5 :-https://download.lineageos.org/hammerhead
Gapps for LG Nexus 5 :- http://opengapps.org/
Source code for Lineage OS for LG Nexus 5 :- http://bit.ly/2iXkonw
I didn’t Install this as I don’t have an LG Nexus 5 device and the Images may be different for you but the procedure will be 99% same below is the video where i install lineage OS on OnePlus 2 its just for reference. if you have any problem watch the video.
We would love here from you about what you think about this in the comments section below. If you want to stay updated with our latest updates you can like our Facebook page or keep an eye on our website also follow us on Twitter @hacksandgeeks
Что на Android 9.0 Pie?
Как мы уже говорили, Lineage OS 16 основана на новейшей ОС Android 9.0 Pie. Android 9.0 Pie — это 9-я итерация и крупное обновление ОС Android от Google. Новый Android Pie вносит несколько изменений в дизайн преемника Android Oreo, но наиболее заметным из них является система навигации на основе жестов. Другие особенности Android 9 Pie — это новый дизайн пользовательского интерфейса быстрых настроек, переработанный ползунок громкости, улучшенная батарея с поддержкой AI, Notch. Поддержка, улучшенная адаптивная яркость, выбор темы вручную, панель управления Android, которую Google называет цифровым благополучием, и многое другое. функции.
Посмотреть видео о Что на Android 9.0 Pie.
Шаги по прошивке Android 9.0 Pie для Xperia Z3 Compact Lineage OS 16 Custom ROM:
1: – Сначала загрузите Android 9.0 Pie Lineage OS 16 Custom ROM для Sony Xperia Z3 Compact по указанной выше ссылке на рабочем столе вашего компьютера.
![Список всех лучших кастомных прошивок для nexus 5x [обновлено]](https://mpshes.ru/wp-content/uploads/c/0/3/c03a1a00512508476877a9f485a829ea.jpeg)
![[official] lineage os 14.1 for lg nexus 5 (hammerhead) - hacks & geeks](https://mpshes.ru/wp-content/uploads/e/7/a/e7a1c7e57ad1a2f5c5dd808c0fa7a185.jpeg)
![[official] lineage os 14.1 for lg nexus 5x (bullhead) - hacks & geeks](https://mpshes.ru/wp-content/uploads/2/0/7/207314aa053d6dc8bc369ce3f20a5f79.jpeg)
![Download and install lineage os 18.1 for google nexus 5 (hammerhead) [android 11]](https://mpshes.ru/wp-content/uploads/3/f/9/3f960722f794ae9f5b9ea853fbee8bdb.jpeg)


2: – Extract boot.img из zip файла отдельно.
3: – Подключите и закрепите USB-накопитель Sony Xperia Z3 Compact на компьютере с помощью USB-кабеля для передачи данных.
4: – Перенести скачано Lineage OS 16 ROM zip-файл в корневую папку памяти телефона / SD-карты.
5: – Теперь переместите boot.img файл в Android-SDK-окна платформенные инструменты каталог.
6: – Затем ВЫКЛЮЧИТЕ свой телефон.
7: – Затем загрузите ваше устройство в режиме загрузчика. Для этого включите телефон, нажав и удерживая кнопку увеличения громкости, снова подключив его с помощью кабеля USB. Светодиод вашего телефона станет синим, и он перейдет в режим загрузчика.
8: – Пока ваш Z находится в режиме быстрой загрузки, перейдите к Android-SDK-окна платформенные инструменты каталог (на вашем компьютере) и откройте Командная строка (Shift + щелчок правой кнопкой мыши> Открыть командную строку).
9: – Введите следующую команду и нажмите Enter.
fastboot flash boot boot.img
10: – Затем введите следующую команду и нажмите Enter.
fastboot reboot
11: – Затем загрузите телефон в режим восстановления. Включите телефон, нажимая кнопки увеличения или уменьшения громкости несколько раз, когда вы видите, что светодиодный индикатор загорелся розовым или любым другим цветом. Вы также можете следовать этому руководству о том, как войти в режим восстановления на любом телефоне Android.
12: – Пока телефон находится в режиме восстановления TWRP, выполните полную очистку данных, нажав кнопку «Очистить». Затем смахните на опцию «Проведите до заводских настроек» внизу.
13: – Перейдите в главное меню восстановления и нажмите кнопку «Установить». Выберите из списка ZIP-файл, который вы скопировали в память телефона на шаге 3.
14: – На следующем экране проведите пальцем по опции «Проведите для подтверждения Flash», чтобы подтвердить установку. Начнется установка.
15: – После завершения установки нажмите кнопку «Очистить кеш / Dalvik», если вы столкнетесь с какими-либо циклами загрузки или другими проблемами.
16: – Перезагрузите телефон, нажав кнопку «Перезагрузить систему».
Вашему телефону может потребоваться от 4 до 5 минут для первой загрузки после установки.
Готово! Вы успешно установили пользовательское ПЗУ Lineage OS 16 на базе Android 9.0 Pie для Xperia Z3 Compact.
Дайте нам знать в области комментариев ниже, если у вас есть какие-либо проблемы или вопросы относительно приведенного выше руководства.
Как установить AOSP Android 11 на Google Nexus 5:
Имея такой длинный список преимуществ, вы, несомненно, захотите опробовать AOSP Android 11 на Nexus 5. Но прежде чем мы перечислим этапы установки, просмотрите раздел предварительных условий. Убедитесь, что ваше устройство соответствует всем указанным требованиям. После этого просмотрите рабочие функции и список известных проблем, присутствующих в этом ПЗУ. После того, как вы ознакомились со всем разделом требований, вы можете продолжить установку.
Рекламные объявления
Предпосылки
- Проверено только на Google Nexus 5 (голова молота)
- Прежде всего, создайте полное резервное копирование устройства.
- В следующий раз включите отладку по USB на Nexus 5. Это сделает ваше устройство распознаваемым вашим ПК в режиме ADB. Так что перейдите в «Настройки»> «О телефоне»> «Коснитесь номера сборки» 7 раз> вернитесь в «Настройки»> «Система»> «Дополнительно»> «Параметры разработчика»> «Включить отладку по USB».
- На вашем устройстве также должен быть разблокирован загрузчик. Если вы еще не сделали этого, обратитесь к нашему подробному руководству по Как разблокировать загрузчик на Nexus 5.
- Далее вам также необходимо установить TWRP Recovery на ваше устройство. Это потребуется для прошивки AOSP Android 11 на Nexus 5. Вы можете обратиться к нашему подробному руководству о том, как Установите TWRP Recovery для Nexus 5.
Скачать AOSP Android 11
Перед тем, как скачать файл прошивки, стоит упомянуть очень важную вещь. Вы должны использовать только надлежащего производителя и прошивку вашего устройства стабильного ПЗУ.
Загрузки
- LineageOS 18.1: Страница разработки XDA | Кредиты для z3DD3r
- crDroid Android v7.5: Страница разработки XDA | Кредиты для Хрокарви
Скачать Android 11 Gapps
После того, как вы загрузили вышеуказанные файлы, перенесите их на свое устройство. Затем выполните следующие действия, чтобы установить AOSP Android 11 на устройство Nexus 5.
Предупреждение
Прежде чем мы начнем с этой процедуры, я настоятельно рекомендую вам создать резервную копию хранилища вашего устройства и всех ваших файлов, хранящихся на вашем устройстве. Более того, рекомендуется очень внимательно следовать инструкциям, упомянутым в этом сообщении, чтобы избежать необратимого повреждения или блокировки вашего устройства. Если что-то пойдет не так, автор или GetDroidTips не несут за это ответственности.
Установите AOSP Android 11 на Nexus 5
- Подключите устройство к ПК через USB-кабель. Убедитесь, что отладка по USB включена.
- Затем перейдите в папку инструментов платформы, введите CMD в адресной строке и нажмите Enter. Это запустит командную строку.
- Выполните следующую команду в окне CMD, чтобы загрузить устройство в TWRP Recovery:
восстановление перезагрузки adb
- Теперь перейдите в раздел очистки и отформатируйте систему, данные и кеш. Проведите пальцем вправо, чтобы завершить форматирование. TWRP Главная
- Пришло время установить AOSP Android 11 ROM на Nexus 5. Для этого перейдите в раздел «Установить», выберите ZIP-файл AOSP ROM и проведите пальцем вправо, чтобы установить файл.
- Если вы также хотите использовать Google Apps, вам необходимо прошить его в этом экземпляре. Перейдите в Install, выберите ZIP-файл GApps и проведите пальцем вправо, чтобы прошить этот файл.
- Когда это будет сделано, вы можете перезагрузить устройство. Перейдите в раздел «Перезагрузка» и выберите «Система».
Теперь ваше устройство загрузится с только что установленной ОС. На этом мы завершаем руководство по установке AOSP Android 11 на Nexus 5. Помните, что первая загрузка может занять некоторое время, и вам, возможно, придется настраивать устройство с нуля.
Кроме того, после того, как вы установили ПЗУ, поделитесь своим мнением о том же в разделе комментариев. В заключение вот несколько Советы и хитрости iPhone, Советы и хитрости для ПК, а также Советы и хитрости для Android что вы тоже должны проверить.
How to Install Lineage OS 15.1 on Google Nexus 5X–
STEP 1. First off All download Lineage OS for your Device and Save it Device storage { Internal and External}
STEP 2. Reboot Phone to twrp Recovery by holding Power and Volume up button or Use code with adb-
STEP 3. ON twrp Go to Backup tab and create a nandroid backup of your ROM to Fix any Bootloop Issue.

STEP 4. Go to Wipe tab and do a factory Reset, you can Include System also if you want for batter results.
STEP 5. Go to Install tab/ Install from SD card Locate Downloaded ROM and Confirm Install.
STEP 6. Wait For Success. after Success Go to Reboot tab and Reboot System Now. Done. Flash G-apps using Same Steps. Done.
Note- Must flash Firmware and stock ROM before flashing the Lineage OS if available in Download Section….
Related articles-
1, How to Flash Official Firmware on Vivo With QCOM-DLoader.
2. How to Disbale Boot verification using No verity Disbaler.
3. How to Repair IMEI Number on Qualcomm Phone
4. How to Install Xposed framework on any Android Device
5. How to Root without PC
6. How to backup NVRAM aka IMEI Number
have any Question Let Me Know via Comment.
Links:-
Unlock bootloader and flash TWRP :- http://bit.ly/2hIDpd7
TWRP for LG Nexus 5 :- https://dl.twrp.me/hammerhead/
Lineage OS for LG Nexus 5 :-
Build by razorloves:- http://bit.ly/2i13znw
Build By p4rot (Updated Daily):- http://bit.ly/2hIKuIW
Gapps for LG Nexus 5 :- http://opengapps.org/
razorloves GitHub Profile:- https://github.com/razorloves
Source code for Lineage OS for LG Nexus 5 :- http://bit.ly/2iXkonw
I didn’t Install this as I don’t have an LG Nexus 5 device and the Images may be different for you but the procedure will be 99% same below is the video where i install lineage OS on OnePlus 2 its just for reference. if you have any problem watch the video.
We would love here from you about what you think about this in the comments section below. If you want to stay updated with our latest updates you can like our Facebook page or keep an eye on our website also follow us on Twitter @hacksandgeeks