

5) Reset Internet Settings
This method has a high success rate of solving the issue if it has not been solved yet by above methods. Follow the steps to Reset internet settings.
- Search for Internet options in the search bar and press enter.
- Then the Internet properties Tab will open.
- Now go to Advanced Tab.
- In Advanced Tab click on Reset from below. Once again it will ask to confirm, Tick Delete personal settings and then Reset it. It will reset the Internet settings of Internet Explorer.
- Now to reset Google Chrome internet settings. Go to settings in Google Chrome.
- Then click on Advanced to open more settings options.
- Now go to extreme last and click on Reset. Now again a small tab will open to confirm it. Click on Reset and finally, it will reset all the settings including Internet settings.
Conclusion:
These are the 5 methods to fix Server DNS Address could not be Found. I hope that any of the given methods have fixed the issue with your browser. If not you can ask us through comment and you can also contact through facebook.
Часто задаваемые вопросы: давайте узнаем больше о ЗОНД DNS ЗАВЕРШЕН NXDOMAIN
Как восстановить зонд DNS через Nxdomain?
- Перезапустив службу DNS-клиента.
- Смените DNS-сервер.
- Проверка локальных хостов.
- Проверка домена DNS пользователя.
- Разблокировка и обновление IP-адреса.
- Сброс веб-браузеров.
- Остановка брандмауэра/антивируса и VPN.
- Другие методы.
Что вызывает Dns_probe_finished_nxdomain?
Эта ошибка чаще всего вызвана отсутствием интернет-соединения или неправильно настроенной сетью.
Это также может быть вызвано не отвечающим DNS-сервером или брандмауэром, препятствующим доступу Google Chrome к сети.
Как исправить DNS в Google Chrome?
В зависимости от причины проблемы одно из следующих решений должно решить проблему хоста:
- Замените свои DNS-серверы публичными DNS-серверами.
- Очистите кеш DNS в браузере Chrome.
- Очистите кеш DNS на локальном ПК или Mac.
- Отключите предварительное чтение или предсказание DNS в Chrome.
- Измените настройки локальной сети
- Отредактируйте хост-файл
- Не используйте ненадежные прокси или VPN.
- Конфликт IP-адресов из-за того, что несколько компьютеров подключены к одному и тому же беспроводному маршрутизатору
- Обратитесь к своему интернет-провайдеру (ISP).
Как исправить поиск DNS для Windows 10 без Интернета?
- Исправления DNS-зонда Готово Нет Интернета в Google Chrome.
- Выполните очистку: Переведя систему в состояние чистой загрузки, вы также можете определить, вызывают ли проблему сторонние приложения или загружаемые объекты. Проверьте эту проблему в состоянии чистой загрузки.
- Проверьте настройки прокси: В меню «Пуск» щелкните слово для поиска «Свойства обозревателя» и нажмите Enter.
Сообщение Просмотров: 710
Решение 10.Измените настройки DNS-сервера.
Неправильная конфигурация настроек DNS-сервера также может привести к недоступности Интернета. Поэтому вам необходимо иметь соответствующие настройки DNS-сервера, чтобы устранить эту ошибку. Выполните следующие действия для устранения этой проблемы:
- Одновременно нажмите кнопки « Windows» + « R» на клавиатуре.
- На вашем экране появится диалоговое окно запуска, введите «Панель управления» в пустом поле и нажмите «ОК».
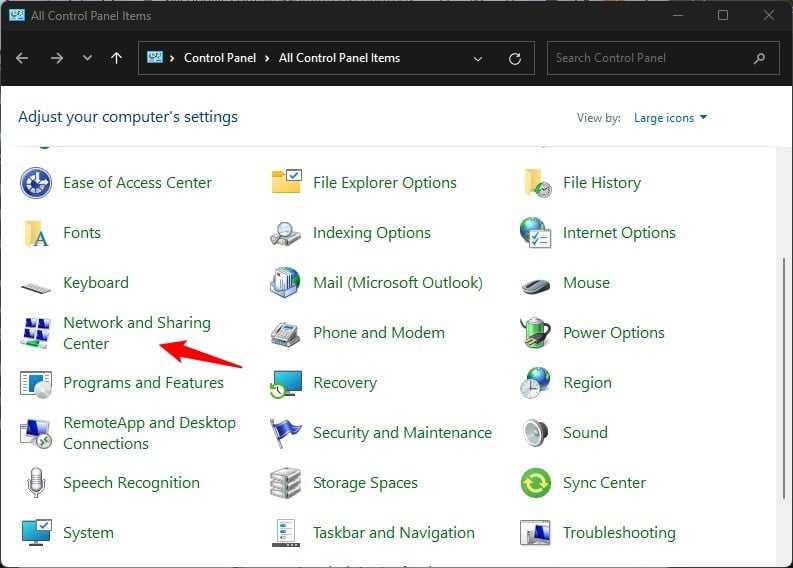
- Нажмите на опцию «Просмотр по:» и выберите «Маленькие значки» из списка. После этого нажмите «Центр управления сетями и общим доступом».
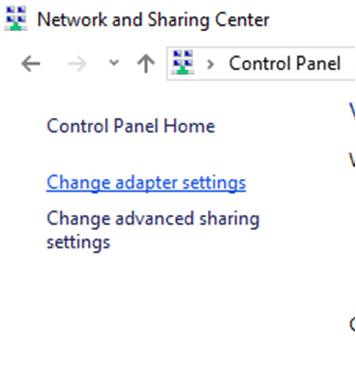
- Выберите «Изменить настройки адаптера».
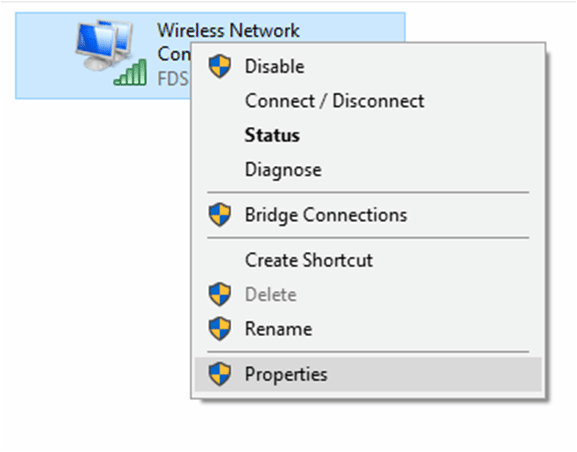
- Выберите значок вашего конкретного подключения («Локальная область» или «Беспроводное подключение»), щелкните его правой кнопкой мыши и выберите «Свойства».
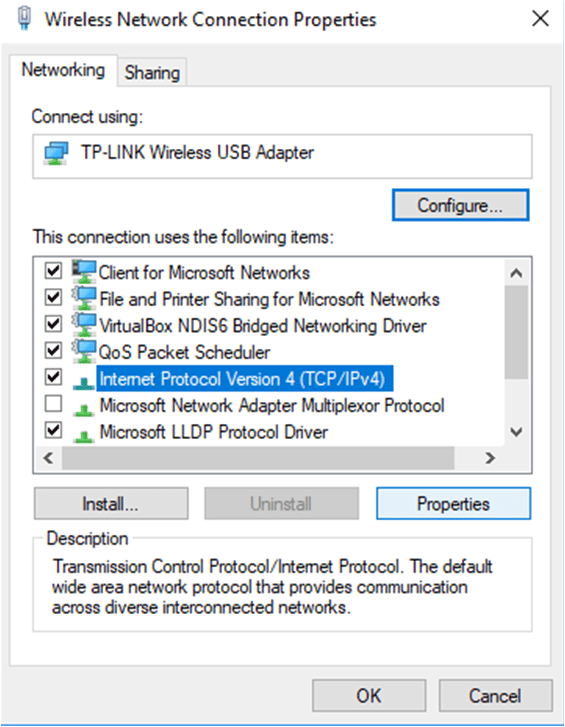
- Теперь щелкните « Протокол Интернета версии 4 (TCP / IPv4) », а затем щелкните значок «Свойства».
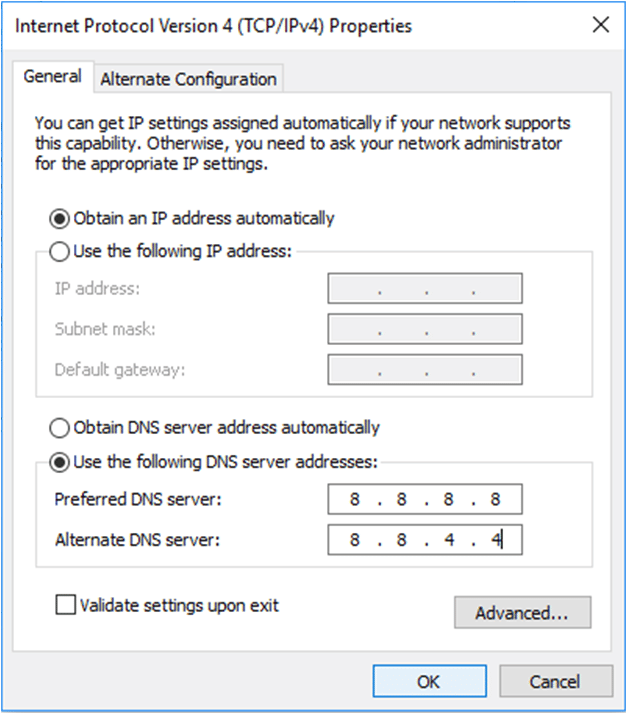
- Здесь автоматически следует установить флажок «Получить адрес DNS-сервера», если вы раньше не возились с этим параметром.
- Установите флажок «Использовать следующие адреса DNS», а затем введите «8.8.8.8» и «8.8.4.4». в адресах первичного и вторичного DNS-серверов соответственно.
- Сохраните изменения и закройте окно.
- Убедитесь, что внесение этого изменения устранило ошибку в Google Chrome.
Restart DNS Client Service
Windows Services (also known as services.msc) are accustomed to alter how Windows services operate on the program of yours. These services are accountable for running programs that are available as well as managing too many system settings and natural resources. You can alter a service’s options for protection, troubleshooting, and performance-related reasons. Only one of the solutions is the DNS Client service, and also restarting it may enable you to resolve the issue with the “Server DNS address couldn’t be found” Error.
The DNS Client service caches Domain Name System names and registers a complete pc title for the computer of yours. If the program is stopped, DNS labels are going to continue being solved. Nonetheless, the outcomes of DNS name queries won’t be cached, and the PC’s name won’t be registered. If the program is disabled, any professional services that explicitly count on it are going to fail to begin. To restart the DNS Client service, opened the Run dialog box by pressing Win + R secrets on the computer keyboard of yours, or even by right-clicking the beginning and selecting “Run” through the contextual menu.
Restart Cahce Service – Server DNS Address Error
After the Run dialog box is wide open, type “services, msc” and press Enter and click “OK.”
In the Services window, find “DNS Client” and right-click it, select “Restart” in the contextual menu. Shut the Services window and find out if this particular fixes the “Server DNS address couldn’t be found” error.
DNS Client – Server DNS Address Error
Lastly, you might reinstall the Google Chrome browser: uninstall it, then download and use it once again.
How to fix “Server DNS address could not be found” Error?Click To Tweet
We hope that the remedies mentioned above solved the issue with the “Server DNS address couldn’t be found” Error. In case you know of a different technique that solved the issue, not used in the guidebook of ours, please share it with us by commenting in the section below.
Fix 11: Perform a DNS Client Service Reset
Windows services serve the purpose of managing your system resources and system settings. They also run the programs on your computer. You can modify these services through the “Services” accessory on your computer. This allows you to troubleshoot problems and also improve security and performance.
You may be able to resolve the issue you are facing with the server DNS address by restarting the DNS client service on your computer.
The DNS client service registers a name for your computer and caches Domain Name System identifiers. If the service is deactivated, your computer’s name will not be registered and the DNS name query results will not be cached, although DNS names will continue to be resolved.
Also, if the service is stopped, other services that are explicitly connected to it will not be able to start. Therefore, follow the steps below to restart the DNS client service:
- Invoke the Run dialog box. You can search for its name in the Start menu search box, or you can press the Windows icon + R keyboard combination to open it quickly.
- Once the Run dialog box comes up, type ‘Services.msc’ into the search field and click the OK button or press Enter on your keyboard.
- Locate ‘DNS client’ in the Services list and right-click on it. Then click Restart in the context menu that opens.
- Close the Services window and check whether the server DNS address issue has been resolved.
4)Clear Host Cache Stored In The Browser
Over the course of time, web browsers store DNS host cache to fast the processing speed. If anyone of these files gets corrupted or expired, it will show an error message on the screen.
To avoid such things, you can clear the host cache stored in the browser.
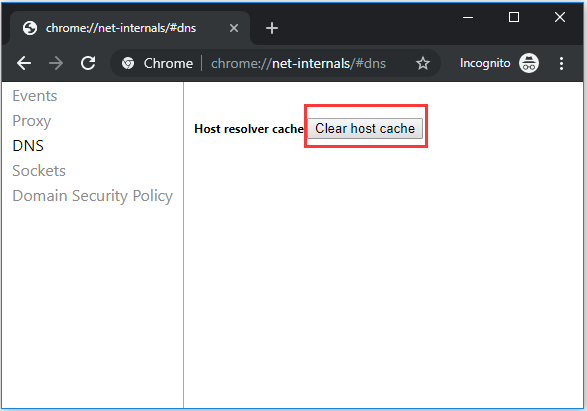
Step-By-Step Procedure For Google Chrome
- Open ‘Chrome’ browser.
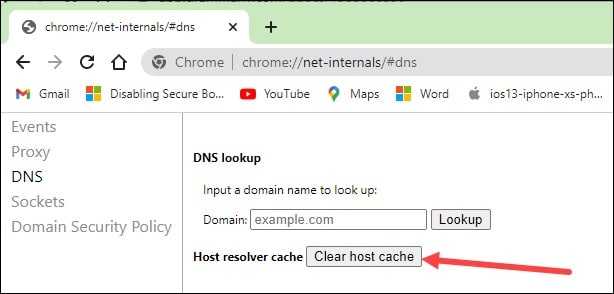
- Select address bar and type a command ‘chrome://net-internals/#dns’ and press ‘Enter’.
- Click on ‘Clear host cache’.
Restart the browser and open your respective sites to check whether the issue has been solved or not.
Step-By-Step Procedure For Mozilla Firefox
- Open ‘Firefox’ browser
- Select address bar and type ‘about:config’
- Press ‘Enter’
It will show a warning sign and ask for permission. You have to proceed from this administration message.
Type ‘network.dnsCacheExpiration’ in the search box
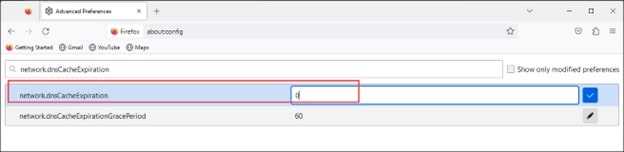
You can see network DNS cache expiration with its status, type and value.
Double click on it and set the value to ‘0’
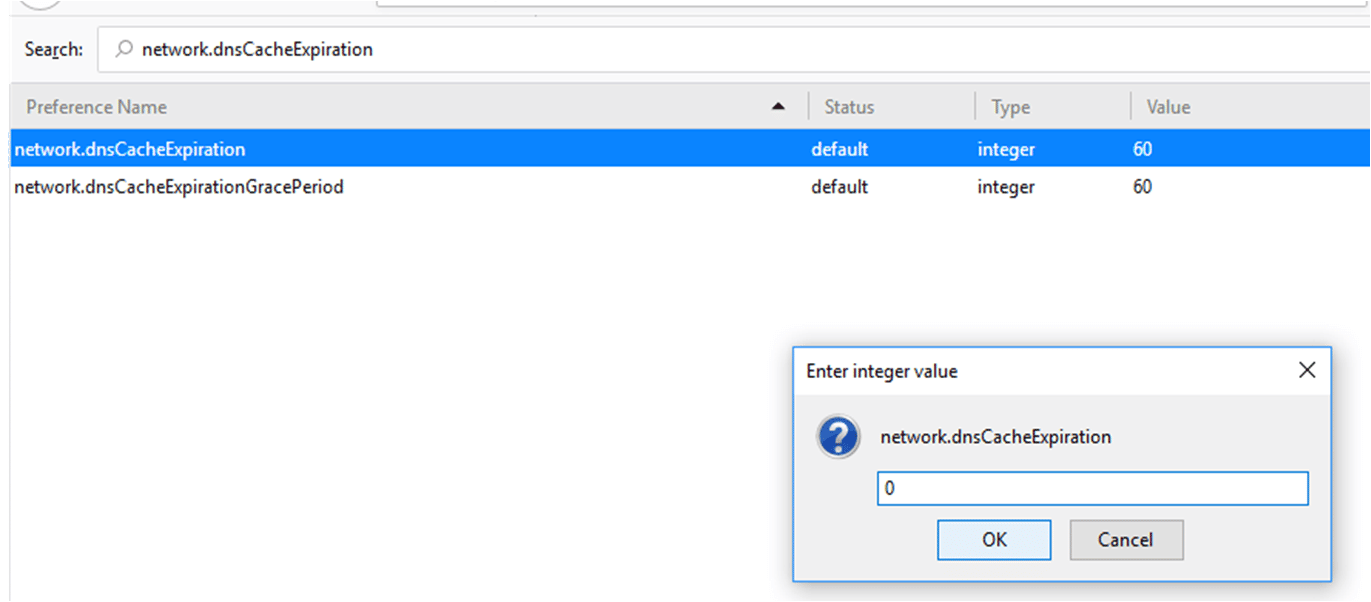
- Click on ‘OK’
- Restart the browser
Since Firefox has now removed all its existing cache files, it will create new files when the next time you visit any site. And, you may experience a little reduction in browsing speed.
Fix Server DNS Address Could Not Be Found
When the IP is changing or returning to the old IP, this type of error starts appearing.
Most of the time this Windows 10 error is faced due to the server down of domain, and the site becomes slow so that this error starts showing.
Method 1:- Clear Chrome Host Cache
Most of the time error server IP address could not be found chrome comes because of some extensions. So, for fixing this server ip address could not be found. err_name_not_resolved error, we have to Clear the cache it might help.
Step 1:- First of all open the Incognito Mode of Google chrome you don’t know how to open it. Do this:-
Click on the three-dot in the right side and here you will see the option of Incognito Mode or you can open it by using key also Ctrl + Shift + N keys.
Step 2:- Now click on the search bar and paste this link and then press enter:-
chrome://net-internals/#dns
Here find the Clear host cache button click on it and after clearing the cache check whether the problem of the DNS address could not be found fixed or not.
Method 2:- Look Up IP and add to Hosts File
With the help of this method, there are 50-50% chances that this error will be fixed because it requires the use of DNS servers to query the IP. If you can access the other websites and unable to access the particular website, then you can try this. And DNS address could not be found in mac is appearing they can also try this method.
Open the below link in your chrome browser:-
https://www.whatsmydns.net/#A/domain.com
Note:- Replace the Domain.com with the domain name which you are unable to access and then take the note of IP address.
Here you will see many IP’s and they all are the same, but if it is not in your case then select the IP which is mostly used and then copy it.
Step 1:- Now, click on the Windows button and then notepad right-click and select the option Run as Administrator.
Step 2:- Now, click on files Open it and browse to:-
C:\Windows\System32\drivers\etc
Step 3:- Choose all the files and their host.
Step 4:- The IP address at the bottom of the file will appear in this format.
127.0.0.1 domain.com
Step 5:- Now, just replace the 127.0.0.1 with the IP address that we have copied before and the domain name with the link above.
Now, after doing this all Just save the file and Now try to access the site. If still, you are unable to access that site then there may be a chance that the site has some problem with their hosting or domain.
Method 3:- Use Google DNS
Most of the time chances that there is a problem with the DNS server. So, we can change the DNS server to the Public DNS. It is the alternative DNS system which is maintained by Google. So, you have to change the DNS manually.
So, for changing the DNS server to Google DNS server follow the below steps carefully because this method has high chances that it will solve your DNS address could not be found error.
Step 1:- Click on the Start button.
Step 2:- Here search Network and Internet or if you do not find it in search then, Go to Settings and there click on Network and Internet.
Step 3:- Here you have to select the Connection type in our it is Ethernet after that on the right panel click on the Change adapter options.
Step 4:- Now right-click on the Connection and then select the Properties from the deep down menu.
Step 5:- After this click on the Internet Protocol Version 4 (TCP/IPv4) and then click on properties.
Step 6:- Now, in the properties of Internet Protocol Version 4 (TCP/IPv4) you have to select Use the following DNS server addresses and then enter 8.8.8.8 as the “Preferred DNS server” and 8.8.4.4 as the “Alternate DNS server”.
After doing this just click on the OK button to make save the changes. That’s it now open Google Chrome and check the error is fixed or not.
Fix 6: Use a VPN
If you encounter the Server DNS Address Could Not Be Found problem with some websites, you can try to use a VPN to resolve the problems. If the website’s DNS was blocked by the ISP (Internet Service Provider), you may run into the problem.
It’s recommended to use a VPN with good reputation. If you’re not sure what product you can trust, you can use NordVPN (You can use NordVPN coupons and promo codes to get a discount, so you don’t need to spend much time on further searching.)
1) Download NordVPN to your computer (You can get a 75% discount if you purchase the product right now.).
2) Run NordVPN and open it.
3) Connect to a server by choosing a country you want to connect to.
Hopefully one of these solutions will fix your network error. Please let us know if you have any questions or comments.
network
Changing DNS server
To change the DNS server in Google Chrome and fix the “DNS address could not be found” error, follow these steps:
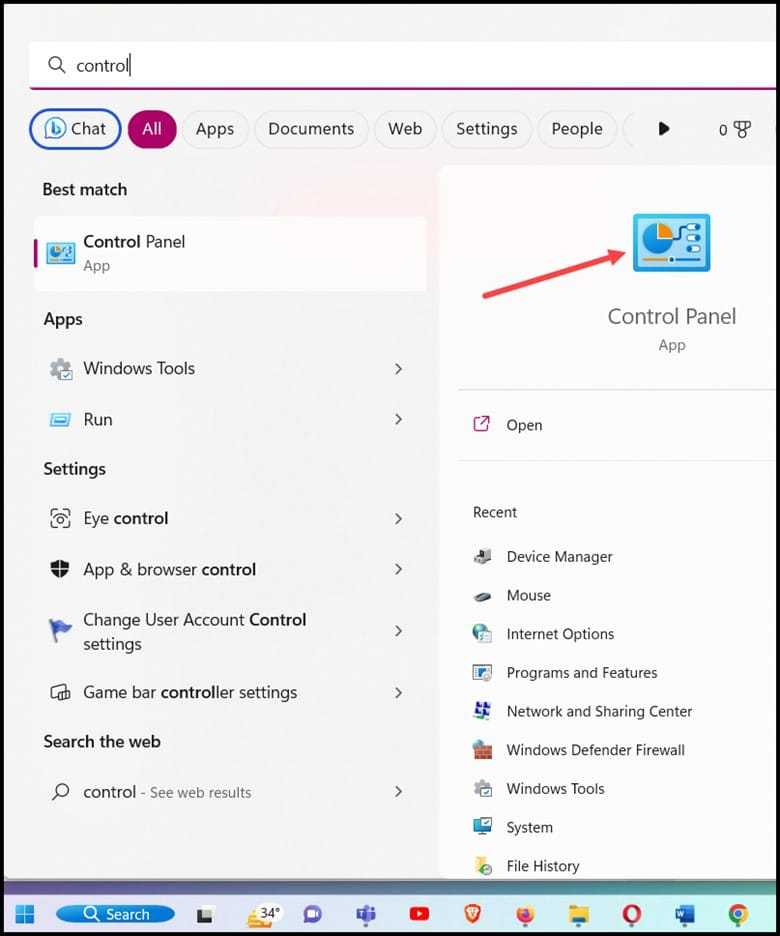
1. Open the Control Panel on your Windows computer.
2. Click on “Network and Internet” and then “Network and Sharing Center.”
3. Select your active network connection and click on “Properties.”
4. In the Properties window, scroll down and select “Internet Protocol Version 4 (TCP/IPv4).”
5. Click on the “Properties” button.
6. In the next window, select “Use the following DNS server addresses.”
7. Enter the preferred and alternate DNS server addresses. You can use public DNS servers like 8.8.8.8 (Google) or 1.1.1.1 (Cloudflare).
8. Click “OK” to save the changes.
Note: If you’re using a different operating system or browser, the steps may vary slightly. Consult the appropriate documentation for your specific setup.
By changing the DNS server, you can resolve DNS issues and access websites without seeing the “DNS address could not be found” error.
Fix 8: Restart the Internet Connection Sharing (ICS) Service
The internet connection sharing service is a Windows service responsible for name resolution, network address translation, and intrusion prevention, especially if you use an office or a home network.
The error may be showing up because this particular service is malfunctioning or not running. So, restarting the service should potentially resolve the problem.
Thus, follow these steps to restart the service on Windows 10 and Windows 11:
- Open the Start menu and search for “Services.”
- Click on the Services app in the search results.
- After the Services app shows up, scroll to the Internet Connection Sharing (ICS) service and click on it.
- Go to the upper-left corner of the Services window and click on the Stop button.
- After the service stops, click on Start.
About “Server DNS Address Could Not Be Found” Error
Why does “server DNS address could not be found” error occur? You will see this message when the Domain Name Server (DNS) is not available.
A domain name is a human readable address of a website like xxx.com. This website also has an IP (Internet Protocol) address. You can either enter the domain name or the IP address to access that website.
DNS server matches the domain name to its related IP address. When you enter the domain name of a website in Google Chrome, your computer contacts DNS server to request and connect the IP address related to the domain name, thus, to open the target website.
If the DNS server can’t find the IP address of the website, then the “server DNS address could not be found” error appears in Google Chrome, and this site can’t be reached in Chrome.
Fix DNS Server DNS Address Could Not Be Found Google Chrome with 4 Methods
Below are 4 methods trying to help fix DNS address could not be found error in Google Chrome.
1. Update Network Adapter Driver
You can try easy ways first. Follow the steps below to update outdated network adapter driver or reinstall the driver.
Step 1. Open Device Manager Windows 10. Press Windows + R, type devmgmt.msc and click OK to open Device Manager.
Step 2. Scroll down to expand Network adapters. Right-click your network adapter device and click Update driver.
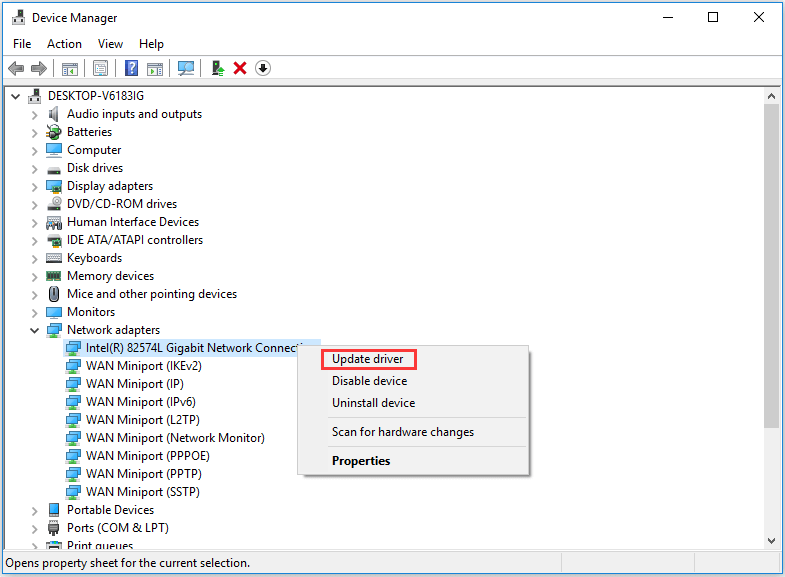
Step 3. Then click Search automatically for updated driver software and Windows will start searching and updating the driver to the latest available version.
If you want to reinstall the driver, you can choose Uninstall device, restart your computer, and your computer will try to install the latest version of the driver. You can also go the manufacturer website to download and install the driver.
2. Clear Google Chrome Host Cache
Step 1. Turn on Incognito mode in Google Chrome. You can open Chrome browser, and press Ctrl + Shift + N shortcut to open a new Incognito window.
Step 2. Next you can type chrome://net-internals/#dns in the address bar and press Enter to open the link.
Step 3. Find Clear host cache button and click it. Then you can check if the “server DNS address could not be found” error is fixed.
3. Change DNS Server Settings
Step 1. Open Control Panel Windows 10. You can press Windows + R, type control panel, and hit Enter to open it.
Step 2. Click Network and Internet -> Network and Sharing Center -> Change adapter settings.
Step 3. Right-click your network connection icon and select Properties.
Step 4. Choose Internet Protocol Version 4 (TCP/IPv4) and click Properties.
Step 5. Tap General tab and click Obtain DNS server address automatically if it is not selected, then click OK. If it is already selected, then you can click Use the following DNS server address, and input 8.8.8.8 in Preferred DNS server and 8.8.4.4 in Alternate DNS server, and click OK.
4. Flush DNS, Reset IP
You can also try to flush DNS or reset IP address to fix server DNS address could not be found Google Chrome error.
Step 1. Press Windows + R, type cmd, and press Ctrl + Shift + Enter to open Command Prompt Windows 10 as administrator.
Step 2. Type the following command lines to flush DNS, renew or reset TCP/IP. Hit Enter to execute the command after typing each command line.
- ipconfig /flushdns
- ipconfig /renew
- ipconfig /registerdns
- netsh int ip reset
#2 – Manually Assign DNS address
In this technique, you manually assign DNS addresses to your computer. Although there are many free DNS servers out there, for the purpose of this article we’ll be using Google’s DNS addresses as they are the best ones out there.
Step 1 – To change the DNS address, open up the Network and Sharing Center.
Now remember, getting to the Network and Sharing Center is different in every other Windows, but one thing is for sure, you can access it through the Control Panel.
Step 2 – Open up the adapter settings area
From the Networks & Sharing Center, open up the adapter settings area, from the menu on the left. In there, you’ll see a couple of icons for your network interfaces.
Step 3 – Right click on Ethernet/Local Area Connection and select properties.
Go for the one you use, in my case; I mainly use Ethernet.
Step 4 – Double click on “Internet Protocol Version 4 (TCP/IPv4)”
In the next dialog box, double click on “Internet Protocol Version 4 (TCP/IPv4)” and a new dialog box will open.
Step 5 – Select “Use the following DNS server addresses”
Step 6 – “Enter 8.8.8.8” as the preferred DNS server
Step 7 – Enter “8.8.4.4” for the alternate DNS server.
In this dialog box (as shown in the figure), select the radio button which says “Use the following DNS server addresses”, then use “8.8.8.8” as the preferred DNS server address & “8.8.4.4” for the alternate DNS server.
These DNS addresses are of Google, and of all the free ones out there, these servers are the best ones.
Step 8 – Select “Validate settings upon exit”
Step 9 – Click OK button
Then just check the box next to “Validate settings upon exit” and click okay. Now go ahead and restart your computer. If the problem persists, then move ahead to the next fix for chrome DNS error 105(err_name_not_resolved) .
2)Change DNS Server Settings On The Computer
If you have incorrect DNS server settings configured on the PC, it is likely that you get an error message. You won’t be able to browse the internet without making it corrected.
Step-By-Step Procedure
Type ‘control panel’ in the search box and select the top option.
Change the View By to Large icons and then open ‘Network and Sharing Center’.
Click on ‘Change adapter settings’ at the left top corner
Now, select your Internet connection, right click on it and select Properties.
On the ‘Networking’ tab, select Internet Protocol Version 4 (TCP/IPv4) and select Properties.
Click on ‘Properties’
It will open a dialog box on the screen
- In ‘General’ tab, select ‘Obtain an IP address automatically’ in the top section.
- Next to that, select ‘Use the following DNS server addresses’
- For Preferred DNS server, type Google Public DNS: ‘8.8.8.8’
- For Alternate DNS server, type Google Public DNS: ‘8.8.4.4’
Click on ‘OK’
Test it by browsing any site. Hope it has solved your problems!
4. Change Your Network Adapter Settings
By default, your network adapter is set to use DHCP, allowing it to obtain an IP address automatically. However, if you’ve tweaked this setting, you’ll need to manually configure the IP and DNS for your network adapter.
You can revert the network adapter’s settings to DHCP from the Control Panel:
- Open Control Panel, and choose Network and Internet.
- Select Network and Sharing Center.
- Click on Change adapter settings from the left menu bar. This will open a window that shows all your network adapters.
- Right-click on the network adapter you’re using, and then select Properties. The network adapter is either called Ethernet or Wi-Fi.
- Double-click on Internet Protocol Version 4 (TCP/IPv4) to open its properties.
- Select Obtain an IP address automatically and Obtain DNS server addresses automatically.
- Click OK to save the settings.
Open Chrome and check if your issue has been resolved.
Fix 13: Reinstall Google Chrome
Another option you have is to try reinstalling your Chrome browser. You can do that through the Control Panel or through the Settings app. Here’s how:
Uninstall Google Chrome via Windows 10 Settings:
- Open the Windows Settings app by heading to the Start menu and clicking on the Settings icon. You can also open the Settings app quickly by pressing the Windows icon + I keyboard combination.
- Click on Apps on the Settings page that opens.
- Under the Apps & Features page, use the search bar to call up Google Chrome.
- Now, click on Chrome and select the Uninstall button to remove the app.
Uninstall Google Chrome via Windows 11 Settings:
- Open the Windows Settings app by heading to the Start menu and clicking on the Settings icon. You can also open the Settings app quickly by pressing the Windows icon + I keyboard combination.
- Click on Apps in the left pane of the Settings window.
- Go to the right side, on the Apps page, and click on Apps & Features.
- Next, go to the Apps List section and use the search bar to locate Google Chrome.
- Once Chrome shows up, click on the three dots to the right of the app and select Uninstall from the menu.
- Follow the prompts to remove the browser from your computer.
Uninstall Google Chrome via the Control Panel
- Open the Run dialog by right-clicking on the Windows icon to bring up the Power User menu. Then click on Run in the list. You could also use the Windows logo key + R keyboard combination to invoke the accessory.
- Type ‘Control Panel’ into the text area and hit Enter or click the OK button.
- Select ‘Category’ in the ‘View by:’ drop-down displayed in the top-right corner of the page.
- Now, click on Programs > Programs and Features.
- Locate Chrome in the list of apps, right-click on it and select Uninstall from the contextual menu.
Afterward, visit the official website of Google Chrome and download the latest version of the browser. Then try and see if the error message will still appear.
Pro Tip: To make sure that your Windows registry is free of leftovers from uninstalled apps, use Auslogics Registry Cleaner to run a scan. The tool ensures that your computer remains stable and continues to perform optimally. It keeps your computer from slowing down, hanging, or crashing due to invalid entries and corrupt keys in your registry. Registry Cleaner has been tested by PC manufactures and proven to be safe for your computer. It uses precise techniques to resolve issues. The tool is recommended by experts. Auslogics is a trusted name and certified Microsoft Silver Application Developer.
That’s how to fix “DNS server might be unavailable” on Windows 11 and Windows 10.
Recover your lost files quickly
Unforeseen circumstances can happen at any time while using the computer: it can turn off due to a power cut, a Blue Screen of Death (BSoD) can occur, or random Windows updates can the machine when you went away for a few minutes. As a result, your schoolwork, important documents, and other data might be lost. To recover lost files, you can use Data Recovery Pro – it searches through copies of files that are still available on your hard drive and retrieves them quickly.
snapshot
About the author
Jake Doe
— Computer technology geek
Jake Doe is the news editor at UGetFix. Since he met Ugnius Kiguolis in 2003, they both launched several projects that spread awareness about cybercrimes, malware, and other computer-related problems.
Contact Jake Doe
About the company Esolutions
References
- Eric Limer. Reminder: Your Browser Extensions Have Absurd Access To Everything You Do Online. Popular Mechanics. Articles on home improvement, home maintenance, energy-saving techniques, shop and craft projects, and technology.
- Justin Pot . Wi-Fi troubles? Here are the most common problems, and simple solutions. Digital Trends. Latest technology news, fun product reviews, and insightful editorials.
- Bradley Mitchell. Before You Buy a Wireless Internet Router . Lifewire. Practical advice to help you live better with technology.
- Chris Hoffman. What Is DNS, and Should I Use Another DNS Server?. How-To Geek. Online tech magazine.
How to Fix the “Server DNS Address Could Not Be Found” Error
The error might not prevent you from accessing all websites. Sometimes, it may appear on random pages, so you could still be able to perform searches on Google, but other sites, such as YouTube and Facebook, will fail to load.
The solutions we’ve presented below will help you resolve the issue. However, there is nothing you can do if the problem is due to a server misconfiguration of the web page you are trying to visit.
How to Fix the “Server DNS Address Could Not Be Found” Issue in Windows 10:
- Restart Your Router
- Run the Network Adapter Troubleshooter
- Resolve network adapter driver issues
- Clear the host cache in Google Chrome
- Flush and renew the DNS
- Configure your DNS server
- Restart the Internet Connection Sharing (ICS) Service
- Use a Virtual Private Network (VPN)
- Perform a DNS client service reset
- Disable Internet Protocol Version 6
- Look up the IP and add it to the Hosts file
- Reinstall Google Chrome
You can attempt these fixes in the order presented or according to your discretion.
7. Restart the Windows DNS Client Service
Windows uses a service called DNS Client to cache DNS and register the computer name. There’s a chance that your DNS Client service may be malfunctioning and causing the «Server IP Address Could Not Be Found» error in Google Chrome.
You can restart the Windows DNS Client Service to get it running again. Here’s how you can do that:
- Press Win + R on your keyboard to bring up the Run dialog.
- Type services.msc in the text box and press Enter. This will bring up a window containing all the Windows services.
- Scroll down to find DNS Client.
- Right-click the DNS Client service and select Stop.
- Wait a couple of seconds so that the service completely stops.
- Right-click the DNS Client service and select Start to get the service started again.
If the DNS Client service options are grayed out and unclickable for you, you can disable the service through Windows config. Here’s how:
- Press Win + R on your keyboard to bring up the Run dialog.
- Type msconfig in the text box and then press Enter.
- In the opened window, go to the Services tab and find DNS Client. Sort the services by name to make this search easier.
- Uncheck the DNS Client service, then click OK to stop the service.
Wait for a minute, and then check the DNS Client service box. Click OK to get the service started again.
Решение 8: удалите файлы из папки ETC
У некоторых людей ошибка вызвана тем, что некоторые дополнительные файлы присутствуют в самой важной папке операционной системы Windows. Если «и т
Д.» папка внутри папки System 32 содержит дополнительные файлы, может появиться сообщение об ошибке. Поэтому на этом этапе мы будем удалять эти файлы с нашего компьютера, но прежде чем продолжить, убедитесь, что вы сделали полную резервную копию всех своих файлов, потому что иногда это может происходить сбоку.
- Нажмите кнопки «Windows» + «E» на клавиатуре, чтобы запустить проводник.
- В проводнике перейдите в следующее место.
C: \ Windows \ System32 \ drivers \ и т. Д.
- Нажмите «Ctrl» + «A», чтобы выбрать все файлы, находящиеся в папке, и нажмите «Shift» + «Удалить», чтобы удалить их с компьютера.
- Проверьте, решило ли удаление этих файлов проблему для нас.